Home Server : Self-hosted services
Discover how I host multiples services on my own server
In a world where we are increasingly reliant on the cloud and large corporations to store our data, I became very interested in self-hosting. For the past three years, I’ve hosted several services on my server for my relatives and myself.
The beginning of my journey: Raspberry Pi and PI-Hole
My self-hosted addiction began with a Raspberry PI and the PI-Hole application, which filters all advertisements and tracking on my network at the DNS level. I used it that way for nearly a year before realizing I needed more.
 PI Hole
The first service I intended to create was a media server. The most popular at the time was Plex. So I attached a 1TB hard drive to store the media and attempted to install and configure Plex Server. It was simple to set up, however after a while, I ran across some limitations.
First, instabilities occurred frequently when Plex or other software was updated. Second, the Raspberry PI model 3B+, which had 1GB RAM and a quad-core processor clocked at 1.4GHz, struggled to decode high-resolution video.
To address these concerns, I took two steps: I installed Docker and purchased new hardware.
Easy setup with Docker
Docker is a platform for running applications within a container. Containers are segregated from one another and include their own software, libraries, and configuration files. Furthermore, because all containers use the same operating system kernel, they consume fewer resources than virtual computers.
 Docker
For these reasons, Docker is an excellent alternative, making it simple to manage different services operating on the same server without worrying about dependencies, incompatibilities, and so on.
I also define all of my container configurations in YAML files using Docker Compose. This allows all server configurations to be easily backed up and updated.
A more powerful hardware
With more and more services and my RPI’s inability to decode some huge media, I decided to purchase more capable hardware. I found a Lenovo Thinkstation on the used market (which is frequently swamped with outdated enterprise hardware). It is significantly less expensive than a traditional server and is adequate for my needs.
 Lenovo Thinkstation
For the OS, I installed the most recent stable Debian release (headless version) to provide a solid base while remaining compatible with the majority of software.
It was placed on a new 512GB SSD to enhance performance. The 1 TO hard disk store only handles data (media, static storage, etc.).
My server services
Now that I had a functioning server, I began to add more and more services based on my needs. I created the following infographic using the services I am now utilizing :
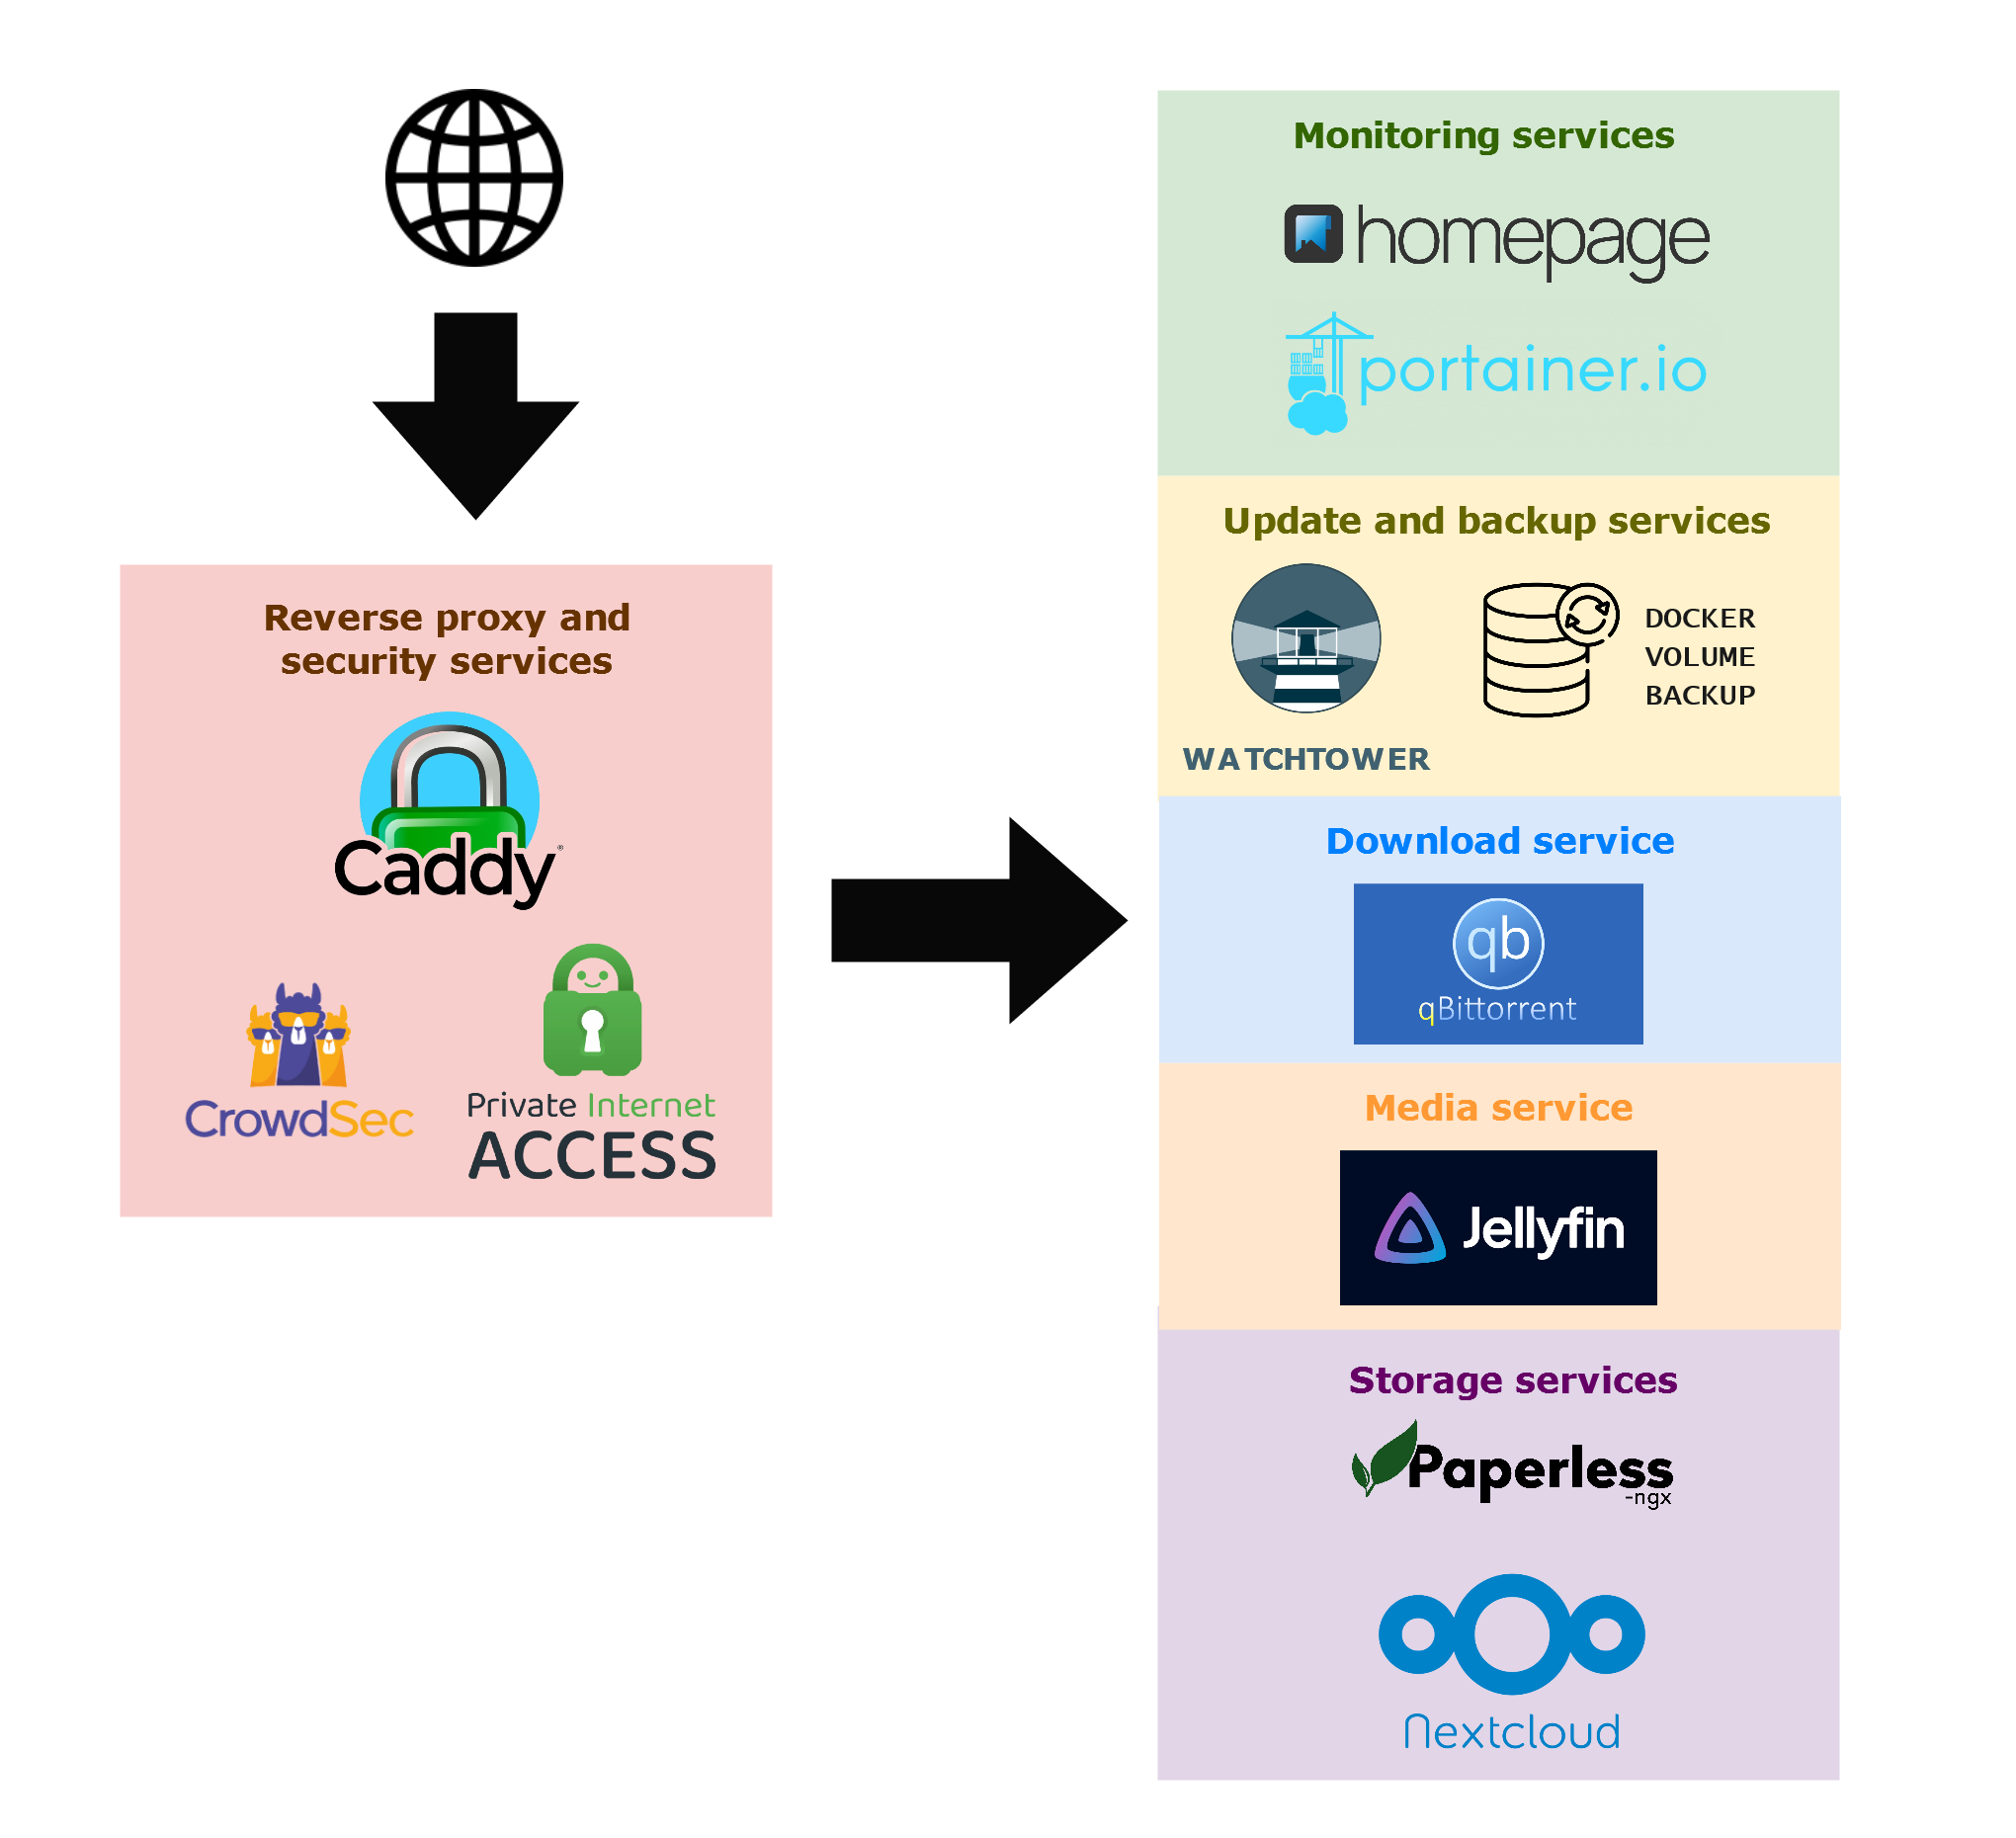 My Home Server Services
Access and security
The most important service is likely Caddy. It is a web server that includes automated HTTPS and reverse proxy functionality.
In other words, due to Caddy, I can access my services directly via a subdomain, and all traffic is encrypted and sent to the 443 port. For example, I can access one of my services directly at “myservice.beniserv.fr” and another at “myotherservice.beniserv.fr”, and so on.
With this configuration, I only need to expose one port (443) to the internet.
I also implemented a dynamic DNS plugin to Caddy to synchronize my IP server address with my domain name provider. So, even if my internet service provider assigns me a dynamic IP address, I can always reach my home server using my domain name.
To improve security, I also use Crowdsec, a service that detects malicious peers and prevents them from accessing my server. Crowdsec analyzes the Caddy logs, and if its behavior engine detects one of the configured scenarios, it blocks the IP address at the firewall level. Crowdsec’s advantage over other similar services (such as Fail2ban) is that it provides a collaborative solution. Indeed, when a Crowdsec user blocks an aggressive IP, the information is shared with all users, thereby improving everyone’s security.
Update and backup
I also use Watchtower, which keeps all of my services up to date and provides me with the most recent security fixes and features. Every night, it downloads and replaces the most recent versions if an update is available.
And, because an update or a storage drive can fail at any time, I use a backup service on a regular basis. Every night, it saves all server configurations and data to an encrypted archive file. This archive is then saved to both my 1 TO hard drive and an AWS cloud storage server. A 7-day retention policy ensures that backup storage does not become bloated by removing the oldest backup archives.
Find the docker-volume-backup service here : https://github.com/offen/docker-volume-backup.
Monitoring
With multiple services running, I need a way to monitor them and receive alerts when an issue arises. This is why I use Portainer and Homepage.
Portainer provides a graphical interface for managing Docker containers. Even though I prefer to use Docker Compose to deploy new services, I still use Portainer to monitor the health of my existing services. When necessary, I can easily restart them from the Portainer UI.
Homepage is a highly customizable dashboard. It provides widgets for a wide range of services and can display various system metrics (uptime, disk space, server temperature, etc…). I use it to quickly access my various services.
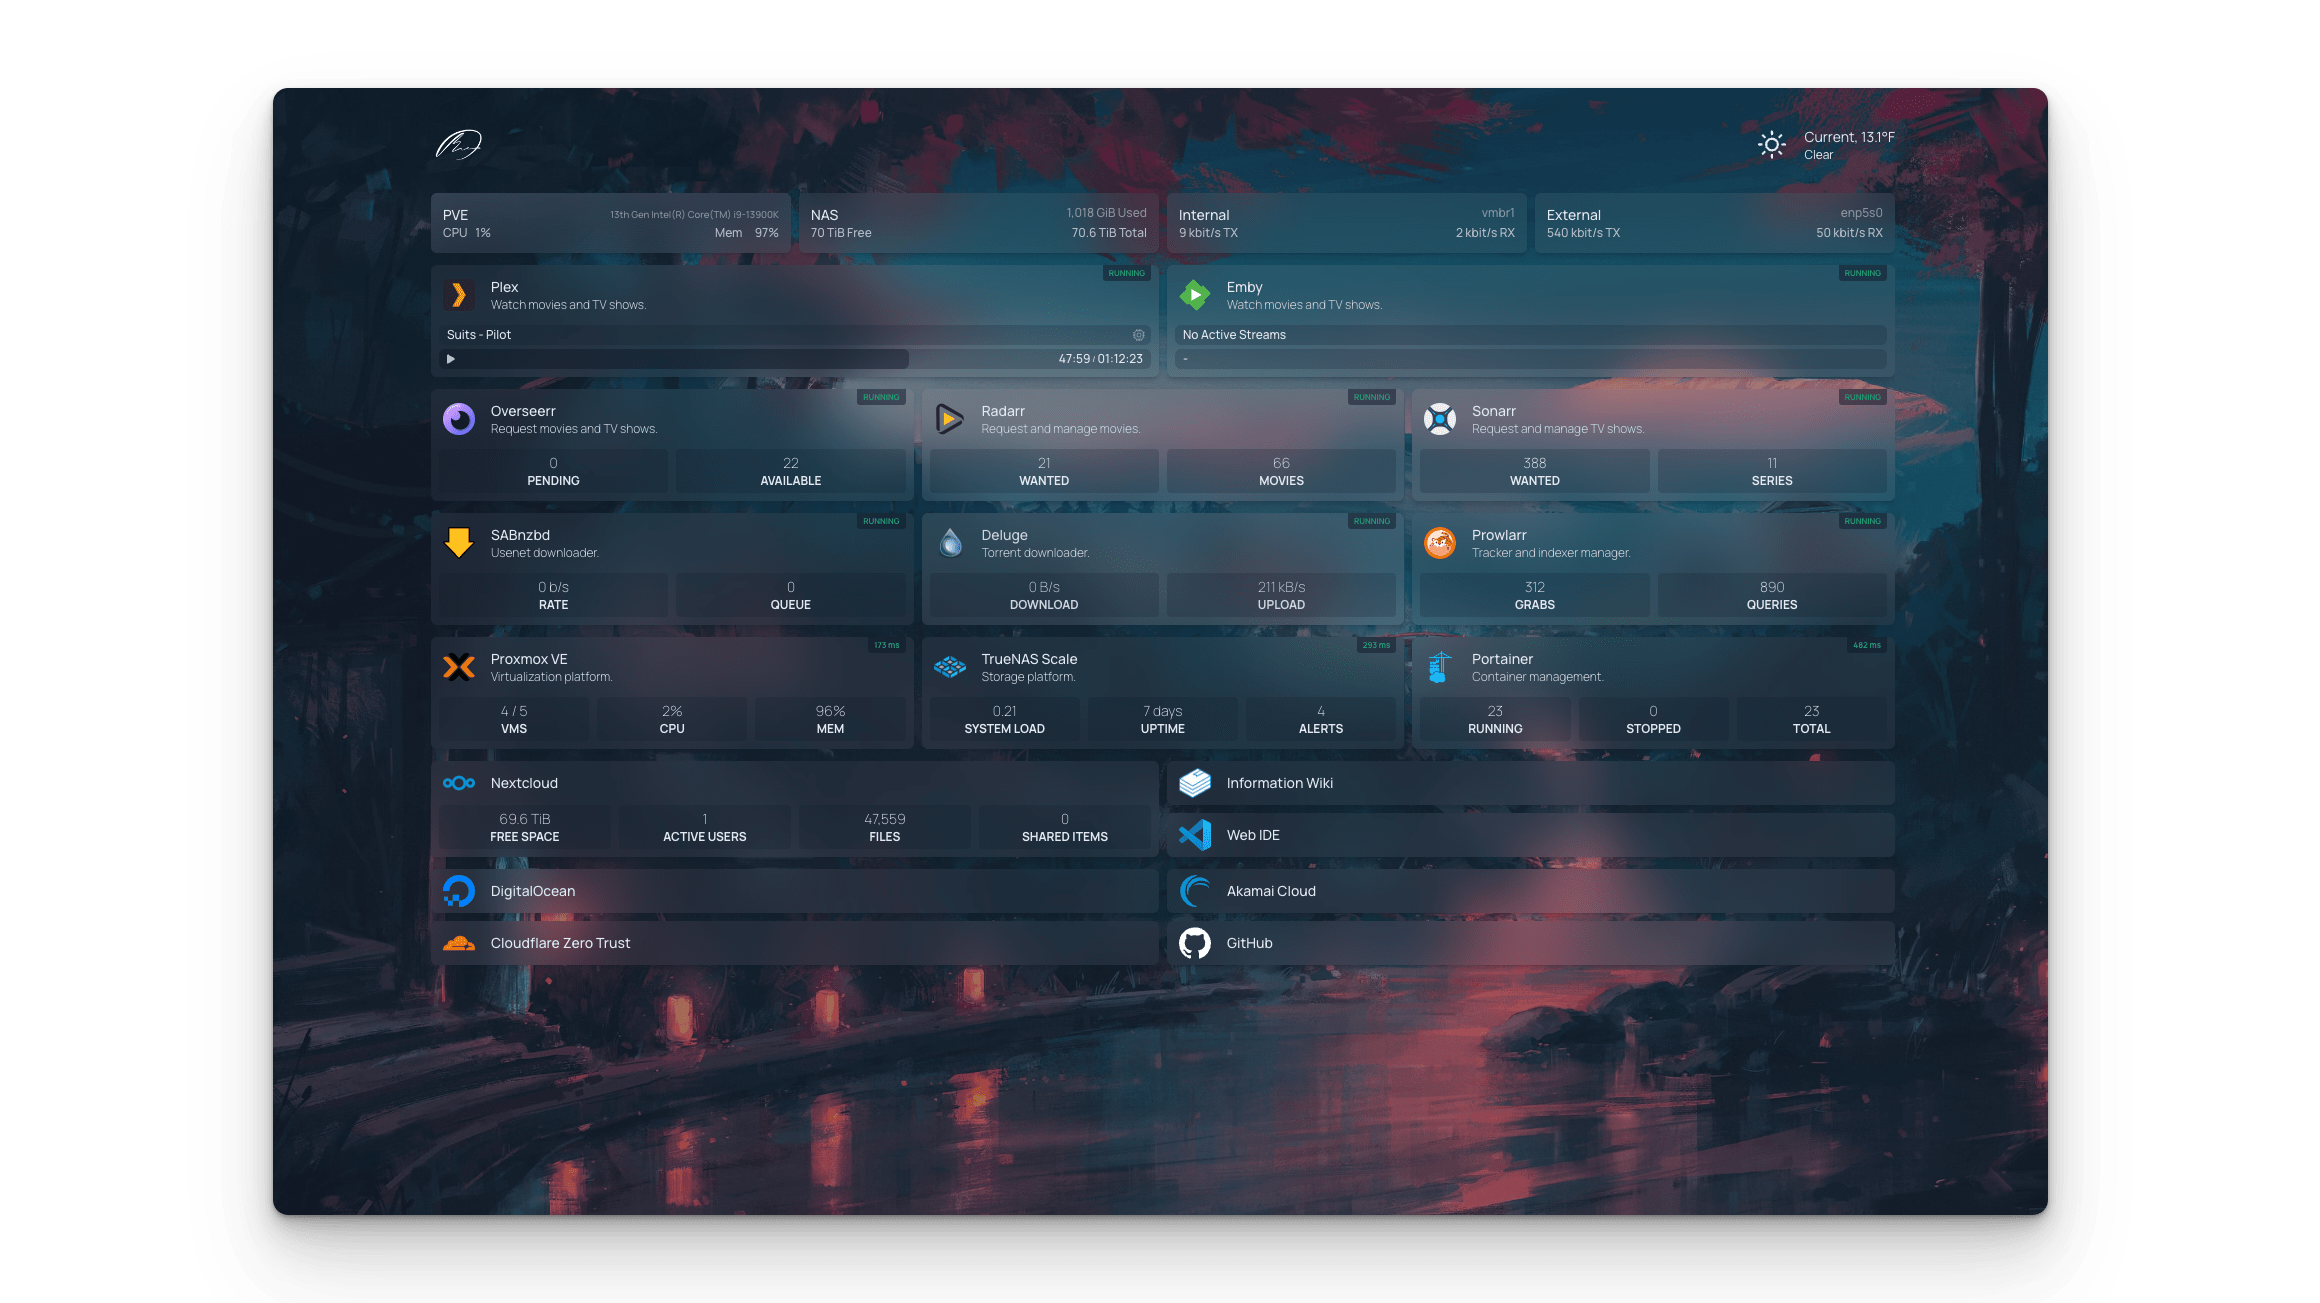 Homepage example
Find the homepage service here : https://github.com/gethomepage/homepage.
To be notified of errors, my services also send messages to a private Discord server.
Other services
As you can see in the previous image, the following services are also running :
- Jellyfin : Media server (replace Plex)
- Paperless-ngx : Document management and storage system
- Nextcloud : Cloud storage service
- QBitorrent : Torrent client
- And more…